Showing posts with label white. Show all posts

Tuesday, June 18, 2013

Nautical Nina

This is a post dedicated to my friend Jenny (Nenny). Last week she asked me to do a kiwi inspired mani and (in my opinion) it failed miserably. I still wanted to do something reminiscent of her, so I decided to finally follow through with the nautical theme I'd been thinking of trying. Nautical fashion always makes me think of her, and she always calls me Nina so it made it easy to bring things full circle.

Anyway, here is my take on a nautical themed manicure, for Jenny.
 

I used Finger Paints Paper Mache  (thank you Nail Board for the rec), American Apparel Passport, China Glaze Hey Sailor and Orly Luxe.

Phone pic

This was supposed to last me until the end of the week, but one of my nails broke all the way down to the nail bed, so I cut them all down and repainted them. Oh well!

This is for you Nenny!

Tuesday, October 30, 2012

Halloween Frankensteins

In case you weren't aware, I love the holidays - especially Thanksgiving, Halloween and Christmas. From the 1st of January I spend my time patiently waiting until September when I can start being excited about all the things I love about this time of year. Without fail, come mid-July I start dreaming of Fall and have to suppress it because eventually there will be snow on all the things and I will regret having spent my summer wishing it was Autumn.

That being said, I didn't really contribute much in terms of Halloween manicures to my blog last year so to make amends I am bringing you yet another set before the haunting season passes.


These are my Frankies. It was my first time trying them and I don't think they turned out too horribly. I was doing them at dear boyfriend's house and I don't exactly have the ideal set-up like I would at my house. The lighting is poor, I have to sit on his bed, the table is far away, etc. That being said, I'd much rather spend time with him than achieve the perfect manicure, so this is the result. 

I do wish I had been a little more patient before putting the top coat on, it dragged the eyes around a bit but the wind from hurricane Sandy was making me nervous and I wanted to get home before any rain started.


They're pretty cute though, I must admit. They're distracting while I'm at work, with their sneaky little faces bouncing off the keys as I type. It feels like I'm wearing 10 little fingers puppets (and yes, I did give it a shot on my right hand but they're looking especially ghoulish and not very presentable). 

I used OPI Greenwich Village as the base, So Easy Stripe Rite in black for the hair, stitches and mouth, Rimmel French Tip White for the eyes and Konad Black for the pupils.  

My pinky nail is definitely the favourite of the bunch, what do you think? I like his beady little eyes. 

Monday, September 24, 2012

Autumn Manicures

Hello lovelies! I have a batch of manicures to show you. I've been a little sidetracked since I started my new job (which is going fabulously, by the way), but it means that I don't have a ton of daylight to photograph my nails with, nor do I have the time to do anything exciting very often. I don't want to bore you with regular ol' nail polish so I've gathered three of my more creative numbers as of late.


Voici my "Retro Stripe" mani, inspired by striped gym shorts from the 1970s. This was after two days of camping, forgive the tip wear.
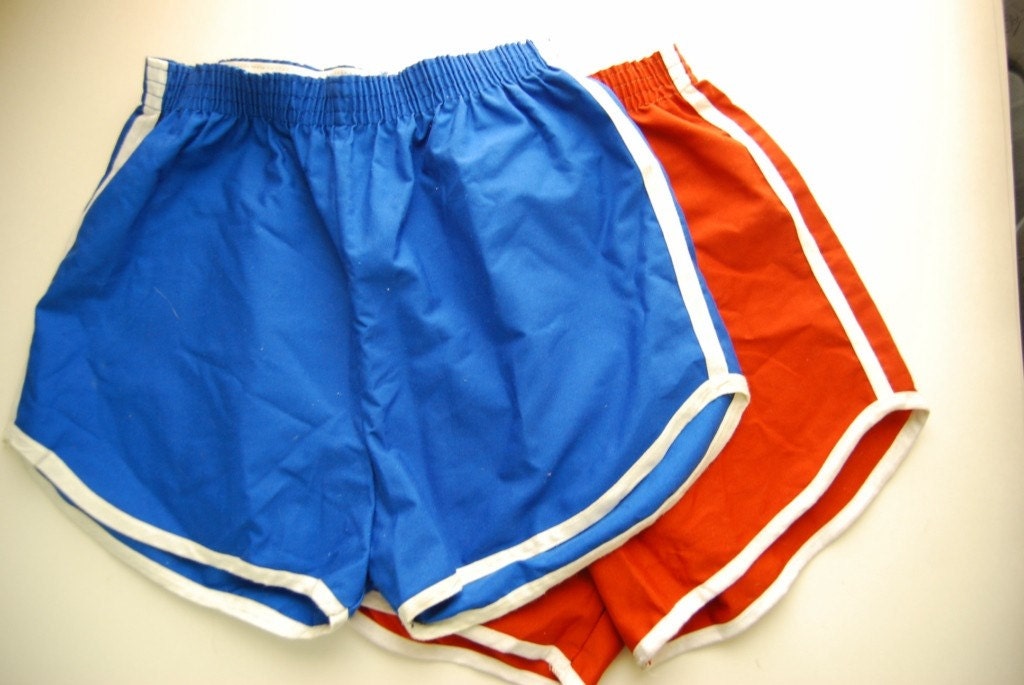
Like these.
I used American Apparel Raccoon as the base because it dries really fast so it was easy to put the tape over it. From there I used Konad White, an orange from Aldo (I'm having a brainfart on the name, I'll get it ASAP ** EDIT - It's called Juicy Gossip) and Double Decker Red from OPI.

I wanted to use OPI Heeere's Tawny but it wasn't drying fast enough and I was pulling it off with the tape! Ugh.


This is what I like to call "Harvest," lame. It's a gradient of OPI The "It" Colour, China Glaze Lemon Fizz and Sally Hansen White On. I was inspired by a photo of wheat - so sue me, I love this season!

Finally - my current manicure. The colours were chosen by my boyfriend, believe it or not. He got all excited about it so I figured I would give him the credit.

Natural light

With flash

Right hand, with flash

Water marble! This is a fabulous blend of - Sally Hansen Mellow Yellow as the base, Joe Fresh Pumpkin, China Glaze Hey Sailor, OPI Heeere's Tawny, and the elusive Aldo orange previously mentioned (** EDIT - It's called Juicy Gossip). I'm in love with this one, it reminds me of the changing leaves.

So - who's still with me? Sorry for the hiatus guys! I'll try to keep things up, I swear. Take care everyone.

Tuesday, February 14, 2012

Valentine's Day Water Marble

The original intention was to take better photos of this mani before posting it, I don't like the fact that I'm just holding my phone, but it ended up getting pretty chipped with all the baking and crafting I've been doing for Valentine's Day so alas, if you want to see the mani this will have to do. I took these photos while waiting for the cupcakes to cool and haven't had a moment since to do anything a little more suitable.

Ultimately, I'm not normally a fan of Valentine's Day but I can't help but get into the excitement over just about any holiday. For this water marble I used Sally Hansen White On as the base and marbled with the same, along with OPI Charged Up Cherry and OPI Flower-to-Flower.


Oooh look, a little while later with the cupcake!

*gobbles*

Happy Valentine's Day to all you lovers out there! ^-^

Sunday, December 18, 2011

NOTD: Santa Baby Dotticure

Another Christmas mani for you! I've been even more into vintage lately than I normally am, so naturally red nails and polka dots have been very appealing to me.

The base colour was Sally Hansen Red Carpet (which I'm going to need a back up of, I'm running low) and for the dots I used Sally Hansen Green With Envy and Rimmel  110 French White Tip Pro. If you've never done a dotticure before you don't have to go out and buy a dotting tool, all I used was the tip of a bobby pin and it worked out great.


I hate posing with polish bottles

One of my mom's Christmas presents

I'm basically in love with this look. I didn't use any base coat (shhh!!) so I hope it doesn't chip soon, I want this to last until at least mid-week. That will give me time to think up something to hopefully top this one, but that might prove to be tricky. 

Hopefully you're not sick of Christmas music yet. This is my favourite, classic version of Santa Baby by Madonna.


Think of all the fun I've missed
Think of all the fellas that I haven't kissed

Tuesday, December 13, 2011

NOTD: Santa Wears Faux Fur

Hm, seems as though time really got away from me there. It's funny how life throws all sorts of things at you at once: a new job, the end of a relationship, Christmas season... Anyway, what matters is I'm here now (and a special shout out to Jenny, who gave me a bit of a nudge to come back).

So here's my current NOTD and it's super festive! I used OPI Double Decker Red for the base layer, So Easy Stripe Right for the "fur" and Finger Paints Private Collection on  top of the white to give it a bit of a shine.


Whaddaya think?? :D

P.S. Yes, those are Christmas socks

Friday, August 26, 2011

NOTD: Dorky Cow Print!

I'm going to start trying my hand at nail art more and more often, since apparently practice makes perfect? After this mani Lord knows I need it. I used Sally Hansen's White On, Rimmel's Black Satin and American Apparel Raccoon to make this cow print. I don't really like using polish to make my designs, I find it's really hard to work with, so from here on end I think I'm going to go back to using acrylic paint (like I used to do in high school).


..... MOOOOOO!

Monday, July 25, 2011

NOTD: Agate Water Marble

I haven't posted any of my water marbles yet, as I'm pretty sure the only good one I've ever done was my first, and I haven't bothered trying to do one since February... so here goes! 


I tried a bunch of different methods with this and screwed a up a few (I actually had to start two nails over completely from scratch) but this is the end result. I really like them! It took about an hour and a half to do it all (re-dos included). I used American Apparel's Cotton for the base, then the other colours are American Apparel Raccoon, China Glaze For Audrey and OPI Greenwich Village.

Thursday, June 30, 2011

NOTD: Canada Day!

I did a little patriotic manicure for Canada Day, hooray! The writing is a little bleehh but I LOVE the beaver, so it's okay *nod*

Isn't he a cutie?!

On my right hand I have some shatters and crackles.. China Glaze is the white one and OPI is the red!


Pretty "meh" in comparison wouldn't you say?

Saturday, June 18, 2011

Tutorial: Dexter Morgan - Blood Spatter Analyst

EDIT - October 28th 2012:  I've just done a second version of this manicure, view it here.

As mentioned in my last post, I've been obsessed with Dexter lately thanks to m'darlin, so I decided to do some blood splatter nails to coincide with Dexter's job and his "hobby." I took pictures along to way so others can try it out too! It would look really cool with other colours, it doesn't have to be blood after all! 

Things you will need:

  • Base Coat
  • Top Coat (Quick dry is awfully convenient)
  • White/Off-White Polish (I used American Apparel Cotton)
  • Blood Red Polish (I used Revlon Valentine. Kind of morbid, considering.)
  • The outer part of a disassembled pen
  • Vaseline-type jelly (Ultrabalm from Lush contains NO petroleum, win!)
  • A sheet of paper to protect your surface
  • Acetone for clean up
  • Cotton swabs

Step 1:
Apply your base coat and your base colour.

Step 2:
Once dried, lay your sheet of paper down on your work space and surround the skin close to your nail with your Ultrabalm/Petroleum jelly. This will make your clean up much easier!

Step 3:
Take your hollowed out pen and your red nail polish. Brush the polish into the thin end quite thoroughly. You want to make sure there's enough in the opening to effectively splatter on your nails.

Step 4:
Aim the pen above your nail and blow really hard into the end (without the polish, obviously). Repeat on all your nails. The results should look like this:


Step 5:
Clean up! Pure acetone works best for this. You want to use a cotton swab rather than a cotton pad so you don't get fibers caught in the polish. Having used the Ultrabalm most of the polish should rub off with ease. After getting the worst off I used a thin angled paint brush to clean up around the edges close to the nail.


Step 6:
Pose with something menacing!


See how easy this was?? This was my first time doing it, it's a piece of cake (especially like me and you lack in the creative ability dept).

Hope it works out for anyone trying it!

Tuesday, April 5, 2011

NOTD: SH Xtreme Wear Red Carpet + Polka Dot Accent Nail

This is another mani partially inspired by Nailside, she's so talented and creative!

For the polka dots I used the tip of a bobby pin (with the rubber bit still in tact, obviously) and it worked like a charm. I practiced a bit on my nail wheel first to see what techniques yielded different sized dots. It works really well. To think I was about to go out and buy a dotting tool!

The bow was tricky, I used a paint brush dipped in polish and had to redo it a couple of times, but it still turned out decently. I didn't even bother trying the bow on my right hand, but the dots are there on the ring finger.


This one is really appealing to the vintage lover in me.