Showing posts with label opi. Show all posts

Sunday, March 31, 2013

Easter Nails - Pastel Stripes

Happy Easter! For today I did a fun pastel rainbow using some colours I rarely even look at any other time of the year. I didn't bother using tape to make these lines perfect, handmade Easter eggs rarely are! Well, mine aren't anyway.


Pink: Revlon Peach Petal
Yellow: China Glaze Lemon Fizz
Green: OPI Gargantuan Green Grape
Blue: Sally Hansen Insta-Dri Blue-Away
Purple: OPI Planks A Lot

Because these shades are so light I needed three coats of each (except the Blue, but I did it anyway), which was simple enough but fairly time consuming. When looked at in the shade they really POP, it's fabulous! There's definitely a part of me that has a soft spot for rainbows. Don't tell anyone.

xox

Sunday, March 24, 2013

Robin Eggs: A Spring Manicure

By looking through my newsfeed over the last month or so, it seems that the people around me are craving spring more than usual. I don't know if it's because we were spoiled last March with 20+ degree weather, or that we've been getting a seemingly endless supply of snow, or maybe I'm just paying closer attention because I've been ready for spring since January. Regardless, I've been succumbing to spring-like choices for my nail colour in hopes that maybe the weather will start to warm up.

This week I bring to you my rendition of robin eggs.


Lately, just like many of you out there, I've been spending a lot of my time on Pinterest. I really love finding beautiful manicures that other people have done, but even more so I love getting inspiration for my nails from non-nail related posts. Since Easter is right around the corner too there's been a lot of egg posts flying around, and I found this photo especially striking.


For this look I used an unnamed Urban Outfitters Smush (I think? It came in a collection with no names on it!) and I sponged China Glaze For Audrey on top. Then to achieve the brown specks, I dipped a straw into a tiny bit of American Apparel Raccoon and blew through it toward the nail surface. I had to make sure to keep my distance from my nails while blowing the polish through the straw, otherwise the splatters would have been too saturated.
I topped it off with some Joe Fresh Matte top coat because it's not as mattifying as Essie's Matte About You and I didn't want too flat of a finish, since the eggs in the photo above have a bit of a sheen to them.

I'm more than halfway done my bottle of For Audrey, which is practically unheard of for me. It's one of my favourite colours and I love finding different ways I can use it.

Anyway, here's hoping spring comes soon!

Tuesday, March 12, 2013

Clover Fields: A St-Patrick's Day Manicure

'Ello 'ello folks! While I'm still waiting on the decision to be made on a new camera, I thought I'd bring you some phone pics of  my current polish. It's a fun little St-Patrick's day manicure inspired by fields of clovers. I wanted to have the textured look to give it a bit more depth instead of settling for a solid colour, since when you look out into a field you don't see a flat shade green.


This is after about four of days of growth and a bit of tip wear. I achieved this effect by dragging the colours through each other while they were still wet, similar to what I did here. I started with OPI Green-wich Village and blended in some Don't Mess With OPI.


Happy St-Patrick's Day everyone!


Thursday, November 22, 2012

OPI Stranger Tides & China Glaze For Audrey

Here we have another phone camera shot. This was taken sometime early summer (maybe late spring) and was honestly one of my favourite manis of the summer. It was just so beachy, it reminded me of sand and the sky. I was really feeling softer colours and pastels for a few months there, which I normally find incredibly boring so I assume that's part of why I didn't bother blogging any of it.


I like that they're alternating but that the difference between the two colours isn't overly dramatic. Creme finishes are by far my favourite so overall this mani was a 100% clear winner in my books.

Tuesday, October 30, 2012

Halloween Frankensteins

In case you weren't aware, I love the holidays - especially Thanksgiving, Halloween and Christmas. From the 1st of January I spend my time patiently waiting until September when I can start being excited about all the things I love about this time of year. Without fail, come mid-July I start dreaming of Fall and have to suppress it because eventually there will be snow on all the things and I will regret having spent my summer wishing it was Autumn.

That being said, I didn't really contribute much in terms of Halloween manicures to my blog last year so to make amends I am bringing you yet another set before the haunting season passes.


These are my Frankies. It was my first time trying them and I don't think they turned out too horribly. I was doing them at dear boyfriend's house and I don't exactly have the ideal set-up like I would at my house. The lighting is poor, I have to sit on his bed, the table is far away, etc. That being said, I'd much rather spend time with him than achieve the perfect manicure, so this is the result. 

I do wish I had been a little more patient before putting the top coat on, it dragged the eyes around a bit but the wind from hurricane Sandy was making me nervous and I wanted to get home before any rain started.


They're pretty cute though, I must admit. They're distracting while I'm at work, with their sneaky little faces bouncing off the keys as I type. It feels like I'm wearing 10 little fingers puppets (and yes, I did give it a shot on my right hand but they're looking especially ghoulish and not very presentable). 

I used OPI Greenwich Village as the base, So Easy Stripe Rite in black for the hair, stitches and mouth, Rimmel French Tip White for the eyes and Konad Black for the pupils.  

My pinky nail is definitely the favourite of the bunch, what do you think? I like his beady little eyes. 

Sunday, October 21, 2012

Hocus Pocus Series Part 2: Sarah Sanderson

This is part 2 of my Hocus Pocus Halloween manicure series. Part 1 was based on Mary Sanderson, you can see it here.

Sarah is my favourite character from Hocus Pocus. Played by Sarah Jessica Parker, this sister is fun, a bit ditzy, boy crazy and wears the sexiest dress.

Once more I took the inspiration for the manicure from the outfit she wears.


To start off I layered China Glaze I Love Hue with China Glaze Below Deck (mauve and red, like her dress) and I noticed she seemed to have a shimmery overlay on the bust of the dress, so I threw on a coat of OPI It's My Year.


After that I used striping tape and made a lace-up/criss cross/ corset design, painted over it with a miscellaneous burgundy-red that I have in my stash and presto - Sarah Sanderson manicure.


I like this manicure because it can be very versatile, especially if you're being almost any sexy female version of something - witch, fairy, pirate, vampiress, etc. It was just a huge pain in the butt to cut all the little pieces of tape so I'm  glad I got this one done on a weekend, it took longer than my normal manis.

I borrowed my Mom's camera for these photos but I don't think I'm a fan, I'll try to get some different pictures with my own later on during the week when the sun comes back out.

Part 3 will obviously by Winifred Sanderson - but that won't be coming until Wednesday or Thursday. See you then!

Friday, October 19, 2012

Hocus Pocus Series Part 1: Mary Sanderson

Any child growing up in North America in the 90's knows that Hocus Pocus is the greatest Halloween movie ever made. Just in case you were living under a rock, it's about 3 witch sisters who attempt to live forever by sucking the souls out of children and can only do so once they're brought back to life on Halloween. The witches were played by Bette Midler, Sarah Jessica Parker and Kathy Najimy.


My darling friend Ali inspired me to to a 3-part series, one manicure based on each of the witches! I'm starting with my least favourite of the 3 and working my way up.

This one represents Mary Sanderson. Bumbling Mary always seemed to get the short end of the stick and that's not really going to change here.

Mary Sanderson, Winifred (Winnie) Sanderson, Sarah Sanderson
As you can see from the photo above Mary wears a red dress with various shades so I wanted to base my manicures on that.


I used 4 different reds here: OPI I'm Suzi & I'm A Chocoholic, Borghese Sonata Berry, OPI Double Decker Red, China Glaze Hey Sailor.


I wanted to create a fabric-y look with different shades of red, so while layering them I didn't wait until they were dry. I dragged the brushes of each colour through the wet polish to achieve this streaky look.


I wasn't too worried about the polish mixing, I definitely got some on the brush but since they're all similar shades I didn't mind that they would mix a little.

So what do you think? I wanted this to reflect how velvet looks depending on the angle you're looking.

I can't wait to do the other two!

Monday, September 24, 2012

Autumn Manicures

Hello lovelies! I have a batch of manicures to show you. I've been a little sidetracked since I started my new job (which is going fabulously, by the way), but it means that I don't have a ton of daylight to photograph my nails with, nor do I have the time to do anything exciting very often. I don't want to bore you with regular ol' nail polish so I've gathered three of my more creative numbers as of late.


Voici my "Retro Stripe" mani, inspired by striped gym shorts from the 1970s. This was after two days of camping, forgive the tip wear.
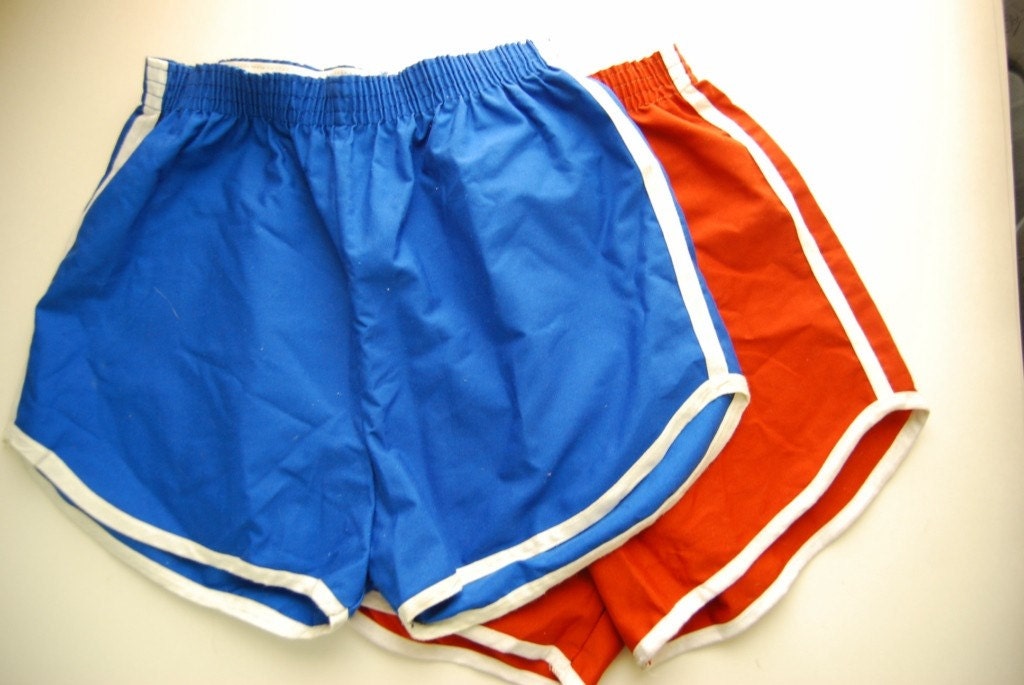
Like these.
I used American Apparel Raccoon as the base because it dries really fast so it was easy to put the tape over it. From there I used Konad White, an orange from Aldo (I'm having a brainfart on the name, I'll get it ASAP ** EDIT - It's called Juicy Gossip) and Double Decker Red from OPI.

I wanted to use OPI Heeere's Tawny but it wasn't drying fast enough and I was pulling it off with the tape! Ugh.


This is what I like to call "Harvest," lame. It's a gradient of OPI The "It" Colour, China Glaze Lemon Fizz and Sally Hansen White On. I was inspired by a photo of wheat - so sue me, I love this season!

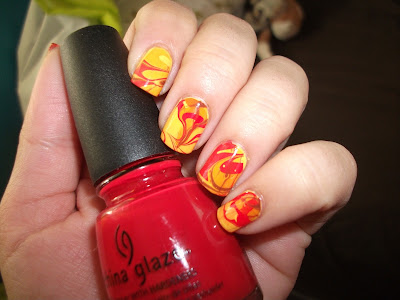
Finally - my current manicure. The colours were chosen by my boyfriend, believe it or not. He got all excited about it so I figured I would give him the credit.

Natural light

With flash

Right hand, with flash

Water marble! This is a fabulous blend of - Sally Hansen Mellow Yellow as the base, Joe Fresh Pumpkin, China Glaze Hey Sailor, OPI Heeere's Tawny, and the elusive Aldo orange previously mentioned (** EDIT - It's called Juicy Gossip). I'm in love with this one, it reminds me of the changing leaves.

So - who's still with me? Sorry for the hiatus guys! I'll try to keep things up, I swear. Take care everyone.

Tuesday, February 14, 2012

Valentine's Day Water Marble

The original intention was to take better photos of this mani before posting it, I don't like the fact that I'm just holding my phone, but it ended up getting pretty chipped with all the baking and crafting I've been doing for Valentine's Day so alas, if you want to see the mani this will have to do. I took these photos while waiting for the cupcakes to cool and haven't had a moment since to do anything a little more suitable.

Ultimately, I'm not normally a fan of Valentine's Day but I can't help but get into the excitement over just about any holiday. For this water marble I used Sally Hansen White On as the base and marbled with the same, along with OPI Charged Up Cherry and OPI Flower-to-Flower.


Oooh look, a little while later with the cupcake!

*gobbles*

Happy Valentine's Day to all you lovers out there! ^-^

Wednesday, February 8, 2012

The Kleancolor Edition

There's this cheapie drug store brand of polish available in the United States (actually I saw some in Ottawa once, but it's not common) called Kleancolor that gained a sudden amount of popularity a few months back and I couldn't help but be a little curious about it. I was doing a swap with someone from Illinois and to make shipping more worthwhile we agreed to the addition of some KC for some Joe Fresh, which is only available in Canada.

First up we have Kleancolor Blue-Eyed Girl.


It's actually a dark blue jelly polish with silver hex glitters.. at least I'm fairly certain they're silver. The jelly is well pigmented but sheer, and the glitter is quite sparse so to achieve this look I had to use some undies, in this case it was American Apparel Passport Blue.

I haven't had much time to be doing my nails lately so I've often found myself layering on to whatever I'm already wearing. I decided to add Nails Inc The Wyndham overglaze top coat to it (which my friend Christine bought and I fell completely in love with) et voila!


Textured flaky goodness.

My current NOTD is Kleancolor Red-Hot. This one has given me a lot of trouble. I've worn it twice now and it just doesn't dry. The first time I wore it I went to the grocery store two hours after I'd finished polishing and an entire nail just slid off.  Then once I got home I was able to do the same to 3 more nails. This time around I had higher hopes since I didn't have any issues with Blue-Eyed girl and, alas, same thing.

The undies for this one is OPI Double Decker Red.


I'd say my biggest complaint with both of these is that it's hard to get an even looking application without globbing the polish on. The glitter is very sporadic, both of these are two coats, otherwise there wouldn't be a very good polish/glitter ratio.

I wish you could see how sparkly the polishes really are though. I'd say they're worth the trouble because the size of the glitter reflects a TON of light and it makes it really hard to look away. The fact that the polish base for both is jelly also gives the nail a really juicy appearance and a lot of depth, almost making it look 3D.

Does anyone know of good jellies that don't take forever to dry?

Sunday, December 25, 2011

NOTD: Christmas Lights!

MERRY CHRISTMAS EVERYONE!

This mani was definitely more of a process than almost any other that I've done. It wasn't hard, just time consuming. I got the idea from I photo that I saw on Pinterest, but I haven't been able to relocate the link I found to credit the original poster.


Hooray!
The base colour is OPI Gargantuan Green Grape, then I used thread (that's right, thread) on my nails which I adhered with some top coat, and I used acrylic paint to make the bulbs. After that I used a Stripe Rite white polish with a thin brush to do the detailing on the bulbs, and for the dots I used Rimmel French Tip White and a bobby pin.

Look at all the things I had to use!


Holy smokes! Here's a couple more shots I took closer up.


I hope everybody has a safe and happy holiday! Surround yourselves with the people you love and indulge in the good company of friends and family.


EDIT

I found the post!!
Click here for the original idea/tutorial.

<3
Lisa

Tuesday, December 13, 2011

NOTD: Santa Wears Faux Fur

Hm, seems as though time really got away from me there. It's funny how life throws all sorts of things at you at once: a new job, the end of a relationship, Christmas season... Anyway, what matters is I'm here now (and a special shout out to Jenny, who gave me a bit of a nudge to come back).

So here's my current NOTD and it's super festive! I used OPI Double Decker Red for the base layer, So Easy Stripe Right for the "fur" and Finger Paints Private Collection on  top of the white to give it a bit of a shine.


Whaddaya think?? :D

P.S. Yes, those are Christmas socks

Thursday, October 20, 2011

Recent NOTD: OPI Zom-body To Love + Splatter

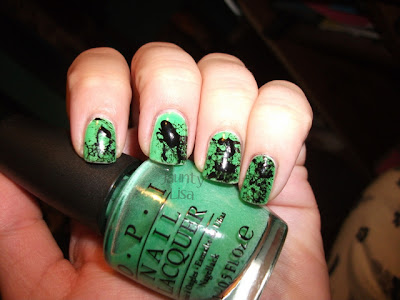
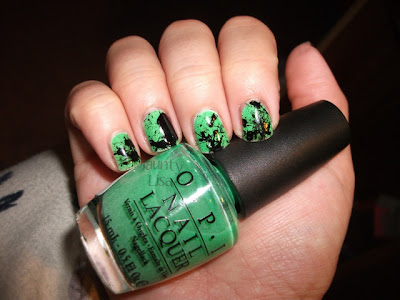
I layered OPI's Zom-body To Love over OPI Gargantuan Green Grape, which I don't think was really necessary at the end of the day because Zombody seems to have turned out pretty opaque after a few coats. Did I mention it's glow-in-the-dark? WIN.
To make it more Halloweeny I threw some black splatters over it with the method I used in this tutorial using Wet n Wild Black Creme.

My glow in the dark photo capturing skills are definitely sub par, but for once I actually managed to get something to appear so that's good enough for me. However, I didn't get a chance to take any pictures of the manicure during the day but the flash actually did the colour justice.

Left hand

Right hand

GLOWING

Not too shabby, huh?

Past NOTD: OPI My Private (Original Holo Version)

This was the result of a swap through Makeup Alley with a lovely lady named Ashley. My Private Jet is an infamous polish known for having two released versions: a FABULOUS holographic one which is really hard to find, and a really boring dud version that doesn't have the rainbow-y goodness of the first. Luckily for me, Ashley sent me pictures of the polish beforehand to ensure that I was indeed getting the real deal.

So MPJ is a brownish greyish polish absolutely riddled with linear holographic sparkles.


Look at all the rainbows! YAY! Best swap ever. Sorry for all the pics I just got so so excited :)

Monday, September 12, 2011

NOTD: OPI I'm Suzi & I'm A Chocoholic

This polish was one of the first OPIs I ever bought (along with Ski Teal We Drop and Yodel Me On My Cell), it's from the Swiss Collection that was released in 2010 for fall. This shade is a reddish brown (or brownish red), which is appealing very much to the autumn-fiend in me at the moment. It went on fairly opaque, this is only two coats, it was just a b!tch to clean up. I hate cleaning up reds, I don't know why they give me such a hard time - but they do.

Every. Single. Time.


I was inspired to use this polish because I'm kind of lemming China Glaze's new Brownstone polish from the Metro collection. Can anyone tell me if these two are similar? I think Brownstone is more ... well, brown. Anyway!

Going on kind of the same thread, this is my favourite fall-time tea. It's called Market Spice from Teaopia and it's a black tea with Orange peel, cloves, marigold, black pepper. It's actually spicier than Chai which is its biggest selling point in my book. Umm, delicious!?

Absolutely, yes.

Thursday, September 8, 2011

NOTD: OPI The "It" Color

My friend Sarah came by my store the other day and gifted me this polish. I couldn't think of a better shade for right now: It's a rich, golden yellow creme that reminds me of changing leaves, HB pencils and school buses. My only complaint about it was the formula (which is kind of a big deal). It applied very patchy, I actually needed 4 coats to get it even. Not desirable.

Regardless, it's here now and I'm happy with the way it looks. I was a little nervous on how it would blend with my skin tone, but it seems to have worked out okay. It might look better when my tan has faded more.


Saturday, September 3, 2011

OPI Catch Me In Your Net over Rimmel Star Trek

So I tried taking pictures of my polish glowing in the dark last night and it didn't work. My camera didn't pick up the glow at all, it was really quite frustrating. I was bored today before work and this magnificent polish was sitting on my desk looking at me, just begging to be worn. I didn't have the time to redo my mani altogether but what goes better with turquoise than navy blue? Not much, let me tell you that. Don't believe me? Give 'er a scroll.

Ali gifted me this polish, I nearly died. Here I thought I was getting to swatch it for one mani but alas - she said I could keep it. It's from OPI's Summer Flutter collection in 2010, I *just* missed grabbing it. It's a dead center dupe for Zoya Charla, but I don't have access to the full Zoya line here so that doesn't make much difference to me. The polish itself is a turquoise glittery foil. Beautiful <3


I couldn't stop staring at my nails while I was driving today! Bad Lisa, bad.