Showing posts with label Rimmel. Show all posts

Tuesday, October 30, 2012

Halloween Frankensteins

In case you weren't aware, I love the holidays - especially Thanksgiving, Halloween and Christmas. From the 1st of January I spend my time patiently waiting until September when I can start being excited about all the things I love about this time of year. Without fail, come mid-July I start dreaming of Fall and have to suppress it because eventually there will be snow on all the things and I will regret having spent my summer wishing it was Autumn.

That being said, I didn't really contribute much in terms of Halloween manicures to my blog last year so to make amends I am bringing you yet another set before the haunting season passes.


These are my Frankies. It was my first time trying them and I don't think they turned out too horribly. I was doing them at dear boyfriend's house and I don't exactly have the ideal set-up like I would at my house. The lighting is poor, I have to sit on his bed, the table is far away, etc. That being said, I'd much rather spend time with him than achieve the perfect manicure, so this is the result. 

I do wish I had been a little more patient before putting the top coat on, it dragged the eyes around a bit but the wind from hurricane Sandy was making me nervous and I wanted to get home before any rain started.


They're pretty cute though, I must admit. They're distracting while I'm at work, with their sneaky little faces bouncing off the keys as I type. It feels like I'm wearing 10 little fingers puppets (and yes, I did give it a shot on my right hand but they're looking especially ghoulish and not very presentable). 

I used OPI Greenwich Village as the base, So Easy Stripe Rite in black for the hair, stitches and mouth, Rimmel French Tip White for the eyes and Konad Black for the pupils.  

My pinky nail is definitely the favourite of the bunch, what do you think? I like his beady little eyes. 

Saturday, October 27, 2012

Hocus Pocus Series Part 3: Winifred Sanderson

This is actually the second version of this manicure, and not at all what I had originally planned. Alas, the first one was a mess so I decided to re-do it today. I am now sporting a sort of funky french. My index finger turned out the best. The sun wasn't shining so the photos are not as crisp as they could be.


Winifred's dress is purple (though in the movie it mostly looks blue), green and has gold embellishments.


I thought this was going to be my favourite of them all but it really didn't turn out the way I wanted it to. I don't have a steady hand so it's hard to get straight freehand lines.


I used Rimmel Black Satin, NFU Oh 56, Kleancolor Blue Eyed Girl and So Easy Stripe Rite gold glitter.

Four years ago for Halloween my best friend and I went dressed up as Winifred and Sarah Sanderson. It was hands down the best costume I've had to-date.


Hmm. I guess we went a little sexier than the characters in the movie.


So there you have it! This was a fun way to pass some manicure time, and I have a couple more up my sleeve before Halloween.


Glamour shot. P.S. I'm actually posing with my costume!

Tuesday, October 16, 2012

Halloween Stripe Madness

I just got my order of striping tape in the mail today and luckily enough I was already wearing glitter polish. I wanted my first slim striped manicure to be a sparkly one so it was super easy to just throw some black on top of my current nails.

I didn't want to do anything symmetrical or the same pattern, I wanted to go wild with it.


Glitter: Sally Hansen Pumpkin Spice, Love & Beauty Rust.


Black is by Rimmel London, Black Satin.

Okay so there's a few things I didn't like about this. First of all, the striping tape is VERY thin and flimsy. That would be great if I was keeping it on the nail but it was difficult to work with. Secondly, the base of Pumpkin Spice  is a very dark brown so it makes the lines contrast less with the black coat on top. Thirdly, my black nail polish is not very opaque. I'm going to have to pick up a new bottle of WnW Black Creme, I need a one coater.

Oh, another thing, it was MESSY. I didn't cut the strips long enough so when I was removing them I got my fingers covered in polish -_-.


Sigh, what a mess.


Another thing I found tricky with this, it was super hard to photograph! I'm assuming it's because the lines weren't crisp because of the glittery base. Any feed back on that, photog people?

So all in all was the mess and effort worth it??

Wooo, striping tape! $6 for ten rolls on ebay.

Stay tuned over the next 2 weeks for a 3-part Halloween series I'm working on!

Sunday, December 18, 2011

NOTD: Santa Baby Dotticure

Another Christmas mani for you! I've been even more into vintage lately than I normally am, so naturally red nails and polka dots have been very appealing to me.

The base colour was Sally Hansen Red Carpet (which I'm going to need a back up of, I'm running low) and for the dots I used Sally Hansen Green With Envy and Rimmel  110 French White Tip Pro. If you've never done a dotticure before you don't have to go out and buy a dotting tool, all I used was the tip of a bobby pin and it worked out great.


I hate posing with polish bottles

One of my mom's Christmas presents

I'm basically in love with this look. I didn't use any base coat (shhh!!) so I hope it doesn't chip soon, I want this to last until at least mid-week. That will give me time to think up something to hopefully top this one, but that might prove to be tricky. 

Hopefully you're not sick of Christmas music yet. This is my favourite, classic version of Santa Baby by Madonna.


Think of all the fun I've missed
Think of all the fellas that I haven't kissed

Friday, August 26, 2011

NOTD: Dorky Cow Print!

I'm going to start trying my hand at nail art more and more often, since apparently practice makes perfect? After this mani Lord knows I need it. I used Sally Hansen's White On, Rimmel's Black Satin and American Apparel Raccoon to make this cow print. I don't really like using polish to make my designs, I find it's really hard to work with, so from here on end I think I'm going to go back to using acrylic paint (like I used to do in high school).


..... MOOOOOO!

Saturday, June 18, 2011

NOTD: Dexter's Ice Truck Killer Nails

I've been watching Dexter with DBF (dear boyfriend) and I am hooked. In the first season the team finds a severed hand in a block of ice with each nail painted a different colour. Naturally I had to give it a shot! *edit* I realize now that I mixed up the middle finger with the ring finger colour. D'oh.


I love skittle manis (ie: multicoloured), they're so much fun!

Tuesday, June 7, 2011

Sweet Potato Chips & NOTD

Wow, long time no blog! I've been pretty uninspired lately in terms of nail polish.. being broke has a really big impact on  the excitement levels I feel towards .. well, pretty much everything. However, I couldn't resist photographing the snack I made today so I took a quick shot of my fingernails too.

Anyway - Sweet potato CHIPS. That's right. They were simple enough to make, all I did was sliced the sweet potato,  lay it out on a baking sheet, sprinkled with a bit (too much) sea salt and bake for an hour or so. It turned out so-so. The trick here is to make sure to evenly slice the chips so they all cook at the same rate. Some were too chewy, some were perfectly crispy. I also ended up putting WAY too much salt without realizing, so that wasn't too nice either. Overall the experience was "meh" but I'm willing to try it out again sometime soon.

They cooked for just over an hour at 250 degrees.


And my nails!

I alternated between Rimmel's Grey Matter and China Glaze Secret Peri-Winkle.

Sorry for the long silence! <3

Tuesday, February 22, 2011

NOTD: Newsprint Manicure & Tutorial

Ahoy there!

Turns out my life is a little chaotic right now to actually blog, but I had some free time this afternoon so I decided to check back in. My nail polish obsession is continuing to grow and evolve into quite the hobby, and I'm finding myself starting to experiment with variations of a regular old manicure.

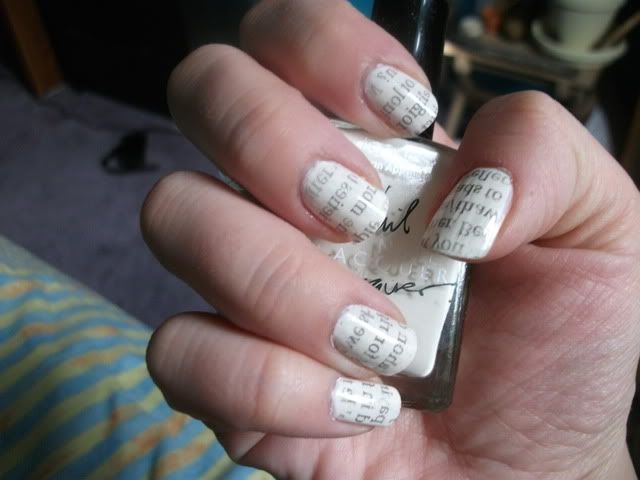
The one I've been playing with this week is called a Newsprint manicure. The first one I did I used only text and it turned out beautifully.


The base colour is American Apparel's "Cotton".  This was a great choice for this mani because it really contrasted the lettering from the newspaper .

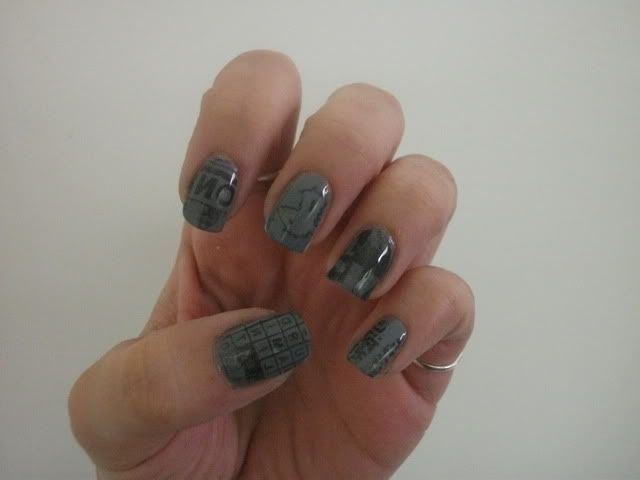
Following this I decided to try things out with a variety of newspaper cut outs, including: advertisements, crosswords, photos of people's faces, comic strips, etc. I found that I had a difficult time with any images with a lot of grey and little contrast. It was hard to get definition from the print. However, I was surprised when some colour lifted from the paper onto the nail! I wish I had used a lighter polish to actually see this a little bit better. 

You can see some blue and peach on my middle finger from the comic strip
For that manicure my base colour was Rimmel's Grey Matter.

Instructions (sorry, I don't have a pics for the steps yet - baby blogger still!):

Things you will need:
Base coat
Light shade of nail polish
Newspaper
Scissors
Rubbing alcohol
Shot glass/small cup
Top Coat

  1. Cut out strips from the newspaper, slightly larger than your nail. Choose sections/images that have high contrast, anything with too much grey won't turn out nicely.
  2. Pour rubbing alcohol into shot glass, set aside.
  3. Apply your base coat and your polish and wait for it to dry completely. Don't use drying drops, as you will still be applying your top coat later on.
  4. Dip your thumb nail into the alcohol and wait 10 seconds. You want to make sure the nail is completely saturated.
  5. Apply a strip of newspaper on your nail face down and press firmly for 5 seconds. Make sure you are covering the entire surface.
  6. Once you peel the paper back the image will be printed on your nail! Repeat with your other nails.
  7. Apply your topcoat only once you've finished all your nails. Try not to rub the print before applying it because it could rub right off! You absolutely need a topcoat for this manicure.
    Tip: Apply the topcoat generously! I dropped it onto my nail in dollops and simply guided it across to cover all the print. If your brush touches the ink or you don't have enough polish on there you could smudge your work (see my thumb nail in the first photo).
  8. Wait for your topcoat to dry completely and voila! You're done!
Hopefully I get a little more into blogging now, we'll see how things get rolling.