Showing posts with label American Apparel. Show all posts

Tuesday, June 18, 2013

Nautical Nina

This is a post dedicated to my friend Jenny (Nenny). Last week she asked me to do a kiwi inspired mani and (in my opinion) it failed miserably. I still wanted to do something reminiscent of her, so I decided to finally follow through with the nautical theme I'd been thinking of trying. Nautical fashion always makes me think of her, and she always calls me Nina so it made it easy to bring things full circle.

Anyway, here is my take on a nautical themed manicure, for Jenny.
 

I used Finger Paints Paper Mache  (thank you Nail Board for the rec), American Apparel Passport, China Glaze Hey Sailor and Orly Luxe.

Phone pic

This was supposed to last me until the end of the week, but one of my nails broke all the way down to the nail bed, so I cut them all down and repainted them. Oh well!

This is for you Nenny!

Thursday, December 13, 2012

Christmas Holly

Although I haven't been posting this holiday season, I assure you my nails have been festive. I'm growing increasingly aggravated with my camera and I find photographing my manicures quite frustrating... so I haven't been wanting to attempt it. This one coming up is actually from my phone. Sorry for the negativity but I'm trying! :)

I used Orly Luxe, American Apparel and China Glaze With Love!


Merry Christmas!!!

Friday, November 23, 2012

American Apparel Mount Royal

I must admit this nail polish is one of my staples. It's the first AA polish I ever bought and the colour hasn't gotten old. It's essentially a one-coater, other than for some touch ups, and it dries incredibly fast. The richness and diversity of the shade makes it a must-have in my opinion. American Apparel is pretty good in terms of nail polish quality.


After this photo I'm 100% certain I need a new camera. I was taking this in direct natural light this morning, and even though the sun wasn't out it was still quite bright out. This is the least noisy of the batch and I still find it unbelievably grainy.

Anyway, AA Mount Royal gets two big thumbs up from me!

Wednesday, October 3, 2012

Autumn Acid Wash

Hello ladies (and the occasional gent), I'm bringing you another fall/autumn manicure inspired by (obviously) the changing leaves at this glorious time of year. I used a technique that I saw on Pinterest that was called "acid washing." It's a very fun, grungy approach to fall manicures.

Basically you layer multiple colours, using whatever your heart desires - but the more contrast the better, and it's recommended to use a dark colour either on the bottom, on the top or both. You then dip a paint brush in acetone and drag it down your nail, exposing some of the colours beneath the surface. 

This is the tutorial I used. I had a hard time the first few attempts, I ended up taking off way too much polish and exposing the bare nail underneath. It definitely took some time to get a handle on this one.


Polish used: Joe Fresh Pumpkin, China Glaze Hey Sailor, Sally Hansen Mellow Yellow, American Apparel MacArthur Park  and American Apparel Raccoon.
Hm! Almost the same colours as my Autumn Water Marble!

I'm kind of on a posting roll here, excellent! A shout out to Dominique, my co-worker's sister - thanks for sharing my blog on your facebook page. She's an excellent photographer, you should check out her website - www.3stems.com.

Monday, September 24, 2012

Autumn Manicures

Hello lovelies! I have a batch of manicures to show you. I've been a little sidetracked since I started my new job (which is going fabulously, by the way), but it means that I don't have a ton of daylight to photograph my nails with, nor do I have the time to do anything exciting very often. I don't want to bore you with regular ol' nail polish so I've gathered three of my more creative numbers as of late.


Voici my "Retro Stripe" mani, inspired by striped gym shorts from the 1970s. This was after two days of camping, forgive the tip wear.

Like these.
I used American Apparel Raccoon as the base because it dries really fast so it was easy to put the tape over it. From there I used Konad White, an orange from Aldo (I'm having a brainfart on the name, I'll get it ASAP ** EDIT - It's called Juicy Gossip) and Double Decker Red from OPI.

I wanted to use OPI Heeere's Tawny but it wasn't drying fast enough and I was pulling it off with the tape! Ugh.


This is what I like to call "Harvest," lame. It's a gradient of OPI The "It" Colour, China Glaze Lemon Fizz and Sally Hansen White On. I was inspired by a photo of wheat - so sue me, I love this season!

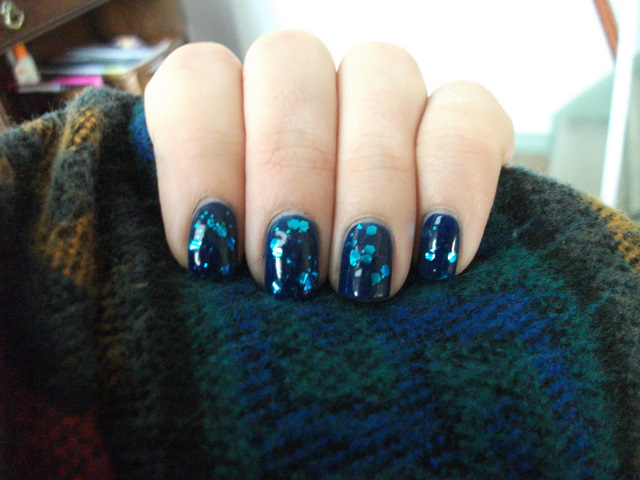
Finally - my current manicure. The colours were chosen by my boyfriend, believe it or not. He got all excited about it so I figured I would give him the credit.

Natural light

With flash

Right hand, with flash

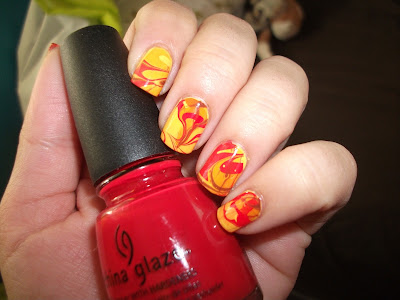
Water marble! This is a fabulous blend of - Sally Hansen Mellow Yellow as the base, Joe Fresh Pumpkin, China Glaze Hey Sailor, OPI Heeere's Tawny, and the elusive Aldo orange previously mentioned (** EDIT - It's called Juicy Gossip). I'm in love with this one, it reminds me of the changing leaves.

So - who's still with me? Sorry for the hiatus guys! I'll try to keep things up, I swear. Take care everyone.

Friday, February 17, 2012

American Apparel Sunset Blvd

You know when you're listening to music, but the genre is just all wrong for how you're feeling at that moment? It's awkward, uncomfortable and downright dissatisfying. That's how I've been feeling about most of the polish I've been wearing lately... Until now.

I picked it up along with the Mac Arthur Park from the previous post and *sigh* is it ever perfect. Before this one, since about Christmas, the polish I've been wearing has been nice but not suitable for my mood. I've been hankering for Spring (since the temperature has been abnormally warm for this time of year) so this beautiful bright coral is giving me a bit of a leg up.


In the shade to show the brightness compared to my skintone


I know it might sound crazy but this colour was like a breath of fresh air to me! I'm sure Ali knows what I'm talking about when I say it just feels good to have found the right colour.

Application was three coats, dried quite quickly. Still love American Apparel polish!

Thursday, February 16, 2012

American Apparel Mac Arthur Park

It had been a while since I'd purchased an AA polish (or even bothered looking, really) so I peeked into the shop while walking through the Rideau Centre the other day and couldn't help but pick up a few. I've always had my eye on this one so I finally bit the bullet.

I'm of the opinion that everyone needs a classic "ugly" colour, in this case - Olive green. I'm not talking Olive like a nice dusty medium green, I'm talking that "grandma's couch" kind of yellowy green. Like pea soup. And olives :P

Sounds flattering, right?

Well it IS. I loved this colour on me.

Fluorescent lighting, colour appears slightly lighter here. 


Something about it just worked, despite the fact that I've really been craving brights lately. The application was a little complicated though. It was really opaque, I could have gotten away with one coat had there not been a couple of patches here and there, yet at the same time I found it runny and hard to control. It made clean up a nightmare; really pigmented + really floody = frustrated Lisa.

After hearing time and again about the wonders of using an angled brush (specifically MAC's) for clean up I threw in the towel and decided it was time to give it a shot. Since I already owned one that I barely ever used it wasn't worth much thought. I was previously using a square-tipped brush, fairly thin, and thought it was doing a good enough job but - move over square tip, there's a new sheriff in town. I'm never, ever going back. It was precise, effective, easy to use... <3 angled brush!

I guess next time I won't be so stubborn and trust the popular opinion.

As luck would have it, olives were part of the dinner menu tonight and I was able to snap this with my phone:


BAM. Dead match.

Wednesday, February 8, 2012

The Kleancolor Edition

There's this cheapie drug store brand of polish available in the United States (actually I saw some in Ottawa once, but it's not common) called Kleancolor that gained a sudden amount of popularity a few months back and I couldn't help but be a little curious about it. I was doing a swap with someone from Illinois and to make shipping more worthwhile we agreed to the addition of some KC for some Joe Fresh, which is only available in Canada.

First up we have Kleancolor Blue-Eyed Girl.


It's actually a dark blue jelly polish with silver hex glitters.. at least I'm fairly certain they're silver. The jelly is well pigmented but sheer, and the glitter is quite sparse so to achieve this look I had to use some undies, in this case it was American Apparel Passport Blue.

I haven't had much time to be doing my nails lately so I've often found myself layering on to whatever I'm already wearing. I decided to add Nails Inc The Wyndham overglaze top coat to it (which my friend Christine bought and I fell completely in love with) et voila!


Textured flaky goodness.

My current NOTD is Kleancolor Red-Hot. This one has given me a lot of trouble. I've worn it twice now and it just doesn't dry. The first time I wore it I went to the grocery store two hours after I'd finished polishing and an entire nail just slid off.  Then once I got home I was able to do the same to 3 more nails. This time around I had higher hopes since I didn't have any issues with Blue-Eyed girl and, alas, same thing.

The undies for this one is OPI Double Decker Red.


I'd say my biggest complaint with both of these is that it's hard to get an even looking application without globbing the polish on. The glitter is very sporadic, both of these are two coats, otherwise there wouldn't be a very good polish/glitter ratio.

I wish you could see how sparkly the polishes really are though. I'd say they're worth the trouble because the size of the glitter reflects a TON of light and it makes it really hard to look away. The fact that the polish base for both is jelly also gives the nail a really juicy appearance and a lot of depth, almost making it look 3D.

Does anyone know of good jellies that don't take forever to dry?

Friday, August 26, 2011

NOTD: Dorky Cow Print!

I'm going to start trying my hand at nail art more and more often, since apparently practice makes perfect? After this mani Lord knows I need it. I used Sally Hansen's White On, Rimmel's Black Satin and American Apparel Raccoon to make this cow print. I don't really like using polish to make my designs, I find it's really hard to work with, so from here on end I think I'm going to go back to using acrylic paint (like I used to do in high school).


..... MOOOOOO!

Monday, July 25, 2011

NOTD: Agate Water Marble

I haven't posted any of my water marbles yet, as I'm pretty sure the only good one I've ever done was my first, and I haven't bothered trying to do one since February... so here goes! 


I tried a bunch of different methods with this and screwed a up a few (I actually had to start two nails over completely from scratch) but this is the end result. I really like them! It took about an hour and a half to do it all (re-dos included). I used American Apparel's Cotton for the base, then the other colours are American Apparel Raccoon, China Glaze For Audrey and OPI Greenwich Village.

Saturday, June 18, 2011

Tutorial: Dexter Morgan - Blood Spatter Analyst

EDIT - October 28th 2012:  I've just done a second version of this manicure, view it here.

As mentioned in my last post, I've been obsessed with Dexter lately thanks to m'darlin, so I decided to do some blood splatter nails to coincide with Dexter's job and his "hobby." I took pictures along to way so others can try it out too! It would look really cool with other colours, it doesn't have to be blood after all! 

Things you will need:

  • Base Coat
  • Top Coat (Quick dry is awfully convenient)
  • White/Off-White Polish (I used American Apparel Cotton)
  • Blood Red Polish (I used Revlon Valentine. Kind of morbid, considering.)
  • The outer part of a disassembled pen
  • Vaseline-type jelly (Ultrabalm from Lush contains NO petroleum, win!)
  • A sheet of paper to protect your surface
  • Acetone for clean up
  • Cotton swabs

Step 1:
Apply your base coat and your base colour.

Step 2:
Once dried, lay your sheet of paper down on your work space and surround the skin close to your nail with your Ultrabalm/Petroleum jelly. This will make your clean up much easier!

Step 3:
Take your hollowed out pen and your red nail polish. Brush the polish into the thin end quite thoroughly. You want to make sure there's enough in the opening to effectively splatter on your nails.

Step 4:
Aim the pen above your nail and blow really hard into the end (without the polish, obviously). Repeat on all your nails. The results should look like this:


Step 5:
Clean up! Pure acetone works best for this. You want to use a cotton swab rather than a cotton pad so you don't get fibers caught in the polish. Having used the Ultrabalm most of the polish should rub off with ease. After getting the worst off I used a thin angled paint brush to clean up around the edges close to the nail.


Step 6:
Pose with something menacing!


See how easy this was?? This was my first time doing it, it's a piece of cake (especially like me and you lack in the creative ability dept).

Hope it works out for anyone trying it!

Saturday, April 23, 2011

NOTD: Easter Egg Nails!

Easter is tomorrow, what a better time to whop out some pastels? I had originally done this mani last weekend for an Easter party we had at work but I accidentally deleted the photo so - here it is again! I made it a bit different this time though, I threw on a matte top coat for an "eggshell" finish (full credit for this idea goes to dear bf).


Without the matte topcoat (pretty, but.. just wait)


This is my right hand, a bit shakier than the left eh?
Yay! The matte top coat actually made the polka dots more defined, they're a lot easier to see now without the glossiness reflecting back at you. They look like Cadbury's Mini Eggs, I wanna nom them.
Happy Easter everyone!

Tuesday, February 22, 2011

NOTD: Newsprint Manicure & Tutorial

Ahoy there!

Turns out my life is a little chaotic right now to actually blog, but I had some free time this afternoon so I decided to check back in. My nail polish obsession is continuing to grow and evolve into quite the hobby, and I'm finding myself starting to experiment with variations of a regular old manicure.

The one I've been playing with this week is called a Newsprint manicure. The first one I did I used only text and it turned out beautifully.


The base colour is American Apparel's "Cotton".  This was a great choice for this mani because it really contrasted the lettering from the newspaper .

Following this I decided to try things out with a variety of newspaper cut outs, including: advertisements, crosswords, photos of people's faces, comic strips, etc. I found that I had a difficult time with any images with a lot of grey and little contrast. It was hard to get definition from the print. However, I was surprised when some colour lifted from the paper onto the nail! I wish I had used a lighter polish to actually see this a little bit better. 

You can see some blue and peach on my middle finger from the comic strip
For that manicure my base colour was Rimmel's Grey Matter.

Instructions (sorry, I don't have a pics for the steps yet - baby blogger still!):

Things you will need:
Base coat
Light shade of nail polish
Newspaper
Scissors
Rubbing alcohol
Shot glass/small cup
Top Coat

  1. Cut out strips from the newspaper, slightly larger than your nail. Choose sections/images that have high contrast, anything with too much grey won't turn out nicely.
  2. Pour rubbing alcohol into shot glass, set aside.
  3. Apply your base coat and your polish and wait for it to dry completely. Don't use drying drops, as you will still be applying your top coat later on.
  4. Dip your thumb nail into the alcohol and wait 10 seconds. You want to make sure the nail is completely saturated.
  5. Apply a strip of newspaper on your nail face down and press firmly for 5 seconds. Make sure you are covering the entire surface.
  6. Once you peel the paper back the image will be printed on your nail! Repeat with your other nails.
  7. Apply your topcoat only once you've finished all your nails. Try not to rub the print before applying it because it could rub right off! You absolutely need a topcoat for this manicure.
    Tip: Apply the topcoat generously! I dropped it onto my nail in dollops and simply guided it across to cover all the print. If your brush touches the ink or you don't have enough polish on there you could smudge your work (see my thumb nail in the first photo).
  8. Wait for your topcoat to dry completely and voila! You're done!
Hopefully I get a little more into blogging now, we'll see how things get rolling.